Cypress Test Automation Tool – Automate Software Testing

Szymon
There’s a huge variety of tools for mobile software testing. The choice depends largely on the testers’ experience level, proficiency in automation and familiarity with available solutions. So far we’ve been focusing on Appium for test automation and it’s been working quite well for us. It proved a good tool to use in Continuous Integration in a combo with Jenkins and Fastlane
This time, I’ve taken Cypress for a spin to see what it has to offer to a manual tester starting his adventure with test automation.
Table of contents
- What is Cypress test automation tool?
- Step-by step Cypress installation for Windows
- Cypress graphic interface
- Hurdles on first approach
- New browser instance
- First impressions
What is Cypress test automation tool?
Cypress is an out of the box tool that is ready for use right after installing. The commonly used Selenium WB does offer more personalized options, but configuration to Cypress’s levels of speed and responsiveness requires a high level of experience. Cypress is much more approachable here and offers quicker start into using the environment, even for inexperienced users.
When choosing a tool to work with, community support plays a crucial role. Cypress cannot be faulted in this respect, as is continuously updated and maintained, with thorough documentation and the option to upload ready-made, or your own custom extensions. Cypress also allows a wide range of custom configuration options. Javascript capabilities are also a great help in adapting the environment to individual needs.
Starting work with Cypress is fairly easy, with plenty of info both in the official and popular media. Tutorial videos, config documentation and ample repositories of sample projects provide all that’s required to start your adventure with Cypress quickly and smoothly.
Step-by step Cypress installation for Windows
Requirements: NodeJS and Cypress
Installation:
- Download and install NodeJS from here: https://nodejs.org/en/
- Check if NodeJS is properly installed using your console. This command should give you response with installed version “asl -v”
- Navigate to your work folder and install Cypress
cd / your / project / path
npm install cypress –save-dev - According to the documentation available on the website, Cypress should now be properly installed and configured, so all you need now is to enter the command:
cd node_modules / .bin /
cypress open
The program should start, but if you’re using Windows, you might encounter the following error:
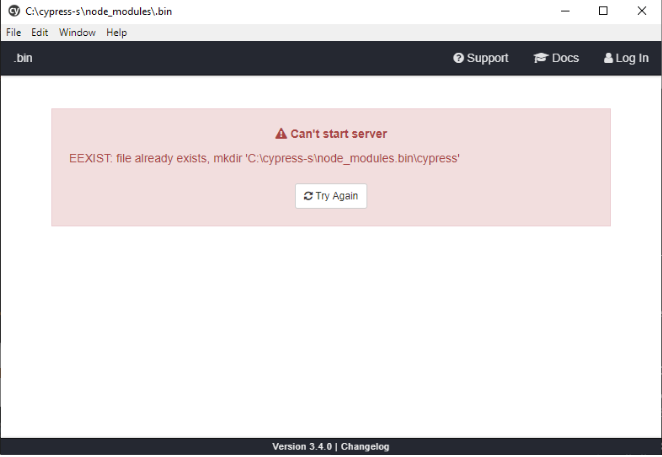
The solution to this is to create a package.json file in the project’s main directory
{
   "scripts": {
     "test": "cypress open"
   }
}
Open the console and navigate to your project path. Then run tests
If you want to use the graphic interface, the easiest solution for Windows is to create a file that will be a shortcut to run the project.
2a. We create a new text file. For this purpose, I simply use Notepad.
cd C: cypress-projectX
altitude run test
Then save the file with the extension “.bat”
In the following example, the first line is the path to the “cd” folder and the project folder defined at installing Cypress. The second command line starts the launcher of the tests prepared for Cypress.
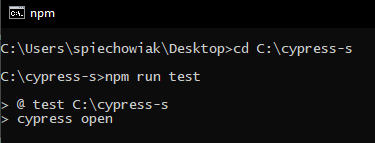
An example of the console window for a project duly named cypress-s after running a previously created batch file
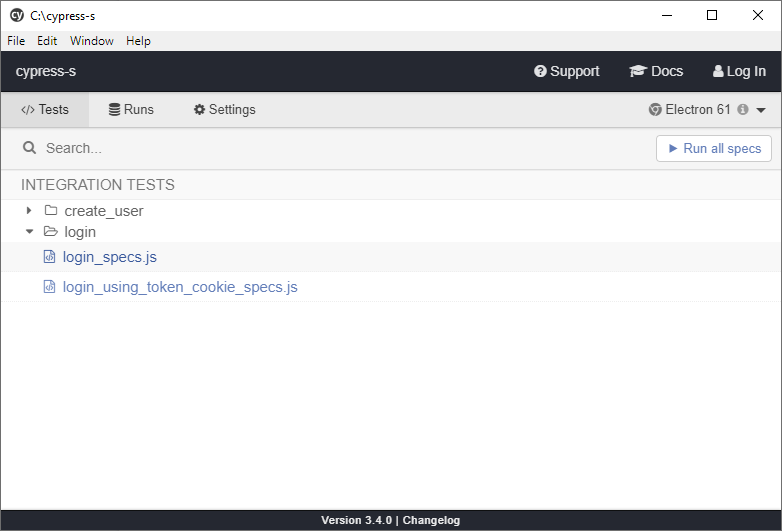
Sample tests are available right after installation. If you don’t see much use for them, they can be removed. Cypress automatically loads the folders and files in the integration folder. The software monitors all the added files, so there’s no need to reload the main window to see newly added tests.
To run a test, double click on it or use the option in the upper right corner – run all tests.
So what does the test structure look like?
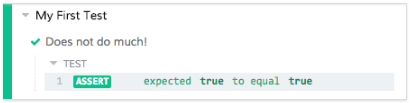
describe('My First Test', function() {
  it('Does not do much!', function() {
    expect(true).to.equal(true)
  })
})
Once again, the documentation proves very helpful at this initial stage. The screenshot below illustrates what is visible after the test.
The test file is obviously not limited to the instructions written in the definition of the “it” function. You have at your disposal a variety of special functions such as “beforeEach” which performs instructions only once, before the scenarios in a given file; or “before”, which will be executed before each scenario. As we are using JavaScript, it’s possible to attach functions or variables defined in external files.
As for configuring Cypress, apart from the typical JS features), we get a variety of convenient tools:
- cypress.js – a configuration file – we can change the base address of the tested page, set up ignore command for HTTP errors or maximum response wait time
- cypress.env – default file for collecting variables used in the project. Its advantage over manually added files is that it is automatically added to each test and prioritized
- plugins – a file where we can add community-supported plugins
- commands – a place where we can save specialized commands we have written.
- and many more – once again I refer to the documentation
Cypress graphic interface
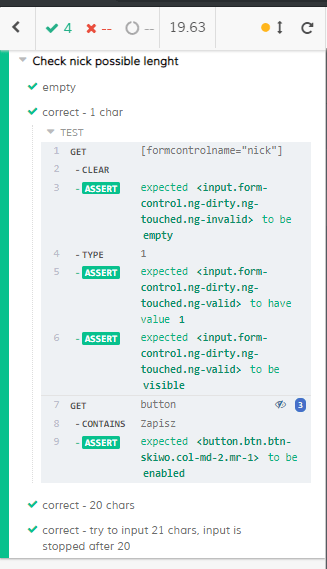
The graphic mode for showing performed tests makes work much easier by giving better control over the operation. In this mode, Cypress lets you backtrace to any chosen step of the test once completed. All you need to do is select the step you are interested in from the list on the left to see the page from before the selected action. This helps significantly in debugging tests.
If we chose the Chrome browser to perform the test, clicking F12 starts the console. Thanks to the aforementioned function, we can check whether, for example, the browser has found a group of elements we are interested in and whether the quantity corresponds with the expected one.

After clicking the eye symbol in the console, the items we are looking for are listed
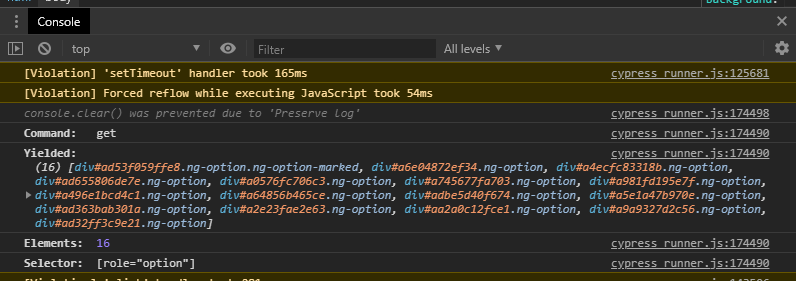
At this point we can choose a specific element and examine in detail.
Let’s take an example of an application that requires the user to log in. If we want to check further aspects of it, we have several options to choose from
- Log in manually each time
- Provide the application with a cookie / token that will allow the website to recognize the user as logged in
The first option will work if, for example, we do not have access to the backend, and testing speed is a secondary consideration. The second option, requiring entry of an active user token is much more thorough, as we can ensure that switching to and from the login screen and all issues related to it are tested, and at the same time we are still be able to perform further application tests. In this example, the website uses Auth0 authentication.
Here’s what the code looks like for the login test:
describe('login using token/cookie', () => {

       it('should successfully log into our app', () => {
         cy.login()
           .then(() => {
             window.location.replace("https://lab4.itcraft.pl:XYZ/web");
             cy.visit('web')
           })
           debugger
       });
})
And here’s the login function definition()
Cypress.Commands.add('login', () => {
   Cypress.log({
     name: 'loginViaAuth0'
   })

return cy.request({
   method: 'POST',
           url: '/admin-api/login',
           headers: {
               "Content-Type": "application/json"
           },
           body: {
               username: Cypress.env('correctUsername'),
               password: Cypress.env('correctPassword'),
           },
        })
        .then((resp) => {
           document.cookie = `AuthUser=${resp.body.accessToken}`
        })
})
Hurdles on first approach
The inquiry was previously checked in Postman. By executing the code, we can see that the server returns a cookie with an active token – manually checked later. On testing, the application won’t switch to the next screen after entering login details, but stays on the login page.
Cypress did not return any info about errors, although the error persists on both Electron and Chrome browsers. For simpler websites, or more experienced programmers – this problem would probably not occur.
Data mocking is a powerful tool and can save a lot of time when planning complex, non-conflicting tests or cleaning up the database before each launch.
New browser instance
Another issue specific to Cypress is the initial impression that it’s unable to continue performing a test case when a new browser window is opened. The tests are only executed in the window where it was initially started. This forces the tester to prepare cases that are independent from each other, so the failure of one test does not disable the execution of the next. You can bypass the problem by checking whether the link leads to the subpage you are looking for and test it in a separate scenario.
First impressions
Summing up the test run of Cypress, I find it a very useful and relatively easy to operate tools. Selenium WebDriver, an API with many language bindings, including Java, C #, Python, Ruby, R, Dart, Objective-C, and JavaScript, built-in Mocha testing framework all prove useful and streamline the testing work.
A very pleasant and responsive mechanism for debugging tests after their completion and backtracking the progress to any previous state is extremely useful for adjustments and repairs to test code.
The test code running inside an actual browser (Chromium based) – makes the tests similar to real browser use. Another advantage of this approach is the speed of testing and responsiveness to code changes. If we have an open browser with a given test, after making changes to the code and saving files, the tests are automatically performed again.
Built-in facilities for mocking server responses is Cypress’s strong advantage over Selenium which has no facilities for that, and to mock server responses, a WebDriver tests would need to run a mock server that returns the responses. While possible, it is a slower and much less convenient method: a fast and in-memory facility for mocking will always outperform a slow out of process one.