Automated UI tests and Continuous Integration – Jenkins + Fastlane + Appium

Sobiesław Gabara
Automated UI tests are invaluable in software production. They come in handy especially when we already have a large application and need to carry out regression tests before releasing a new version of our application.
Table of contents
- Automated UI Testing
– Simulators - Tools used by itCraft for automated UI testing
– Jenkins
– Fastlane
– Appium - User Interface test environment Step by Step
– Step 1: Create a test script
– Step 2: Connect the app to be tested
– Step 3: Fastlane it
– Step 4: Jenkins triggers - What next?
Our software testing practice shows that it is quite easy to find yourself in a situation where a new piece of code causes errors in the operation of modules created earlier. Generally, such situations should not be taking place, but we are only human and we all make mistakes.The UI tests are only one of several layers of testing (next to unit tests and integration tests) required to confirm that the latest version of the application meets the UI quality standards. Manual UI tests are a solution here, but far more time consuming, especially when you are dealing with a multi-platform application (IOS and Android).
We also recommend reading one of our earlier articles on the UI design process. You will learn from it why you need UI / UX design and how User Interface development proceeds.
Automated UI Testing
A much better option than running manual tests is to spend the time on writing automated tests of the UI. Automated UI tests will solve, among others, the issue of the need for re-testing at each update of the app. The tests perform the same actions on a tested UI functionality a manual tester would perform by hand.
Automation of tests enables better, data driven documenting and reporting of issues.
In the article below I will focus on discussing UI automated tests for the IOS platform. The technical details of implementation differ slightly between Android and IOS. In this case, the general goal was to create a system that could test both platforms, but the techniques described below apply only to IOS.
Simulators
We will be testing using simulators. It is possible to connect physical devices and test on those, but running tests on simulators is much easier to implement – we can test our application on any Apple device with virtually any version of the IOS system installed. Testing on physical devices is much more resource- and time-consuming.
I assume readers’ basic knowledge of the tools described in the article, but I will add some links and short descriptions anyway :). All the tools described are installed on a separate MacOs machine dedicated to software testing tasks. We will also have Android Studio installed so we have all the necessary tools to build an Android version. Xcode with command line tools is the obvious necessity for the IOS platform.
You may be interested in:
Flutter Review – Cross-Platform Technology from Google – Learn about the benefits of the new technology from the Gigant from Mountain View
Tools used by itCraft for automated UI testing

Jenkins
Jenkins is an open source automation server written in Java. When we have a separate application building machine, Jenkins is our choice. There are many alternatives to Jenkins, so anyone can find something suitable.
Fastlane
Fastlane is a set of scripts written in Ruby that facilitates and automates the build creation process. It has a lot of possibilities and can be used on both IOS and Android. Detailed info on Fastlane.
Appium
Appium is a platform for performing automated UI tests for both IOS and Android . The undoubted advantage of appium is that with one test code with minor modifications we can test two platforms, which, if not, saves time.
We wrote previously about this tool on our blog. If you want to learn more read this article: Appium – free, open source tool for automatic testing of apps
OK, now that we have all the pieces of the puzzle – let’s see how to combine them into an automatic testing system?
Ready? Let’s go!
User Interface test environment Step by Step
Step 1: Create a test script
The first step is to write / create a test script. I assume that you already have such an appium script in the git repository. To be able to run it in Jenkins, you need to create a task to download the repository to the build machine and then execute the script.
Remember to reject the jdk path to the PATH variable in the section
“Inject environment variables to the build process”
JAVA_HOME=/Library/Java/JavaVirtualMachines/jdk1.8.0_171.jdk/Contents/Home
PATH=$JAVA_HOME/bin:$PATH
And here’s the “Execute command” section
echo "-------------- TESTS IOS --------------"
echo "run appium"
appium --address 0.0.0.0 --port 4723 &
sleep 5

echo "run mvn test"
cd /Users/jenkins/project-dev-tests-ios/TestAutomation/
mvn test -Dsurefire.suiteXmlFiles=testng-ios.xml -Dplatform=iOS -DversionOS=12.2 -DdeviceName='iPhone X'

echo "kill appium"
kill $(ps aux | grep 'appium' | awk '{print $2}')

echo "kill simulator iPhone X"
killall "Simulator"
We start Appium, go to the folder where we have the test script and run Maven with parameters indicating what kind of simulator it should be running. After completing the tests, Appium and the simulator close.
Step 2: Connect the app to be tested
Inside the test script, insert the path to the application .app file – Appium must have an application to test. As you probably know, when generating the archive from Xcode and then importing it, we get a file with the extension .ipa However, if you look inside (ipa is in fact a package – try changing the extension to zip and unpacking it – you will see :)) – you will find an .app file which is needed as input for appium. Just how to automate the creation of the .app file and point it to the appium script?
Step 3: Fastlane it
Fastlane to the rescue! We’ve set up one shared folder for fastlane and appium – Fastlane will upload builds there, and appium will download the app file for testing from it. Fastlane has its own configuration file – fastfile. That’s where we add a lane, which will do what we need – create an app file and put it in the folder indicated. We will use the fastlane xc build command. Here is a fragment of our fastfile
desc "Debug simulator build for automated UI appium tests"
        lane :dev_sim do
        clear_derived_data
        xcbuild(
            workspace: "Project.xcworkspace",
            scheme: "PROJECT-Dev",
            configuration: "Debug",
            xcargs: "-sdk iphonesimulator SYMROOT='~/appium_test_builds/ios/project' -UseModernBuildSystem=NO"
        )
    end
At the beginning we clean the derived data folder – it is a useful function – it happens quite a bit that after changes the project does not want to compile and only a clean helps.
The build command has several parameters – workspace name, schema name, configuration type and lastly xcargs – the most important parameter for us. Here we can substitute arguments that go directly to xcode command to build xcodebuild build. In our case it is an indication of the SDK type for the simulator, giving the path to the place where the result files (SYMROOT) are to be stored and using the legacy build system.
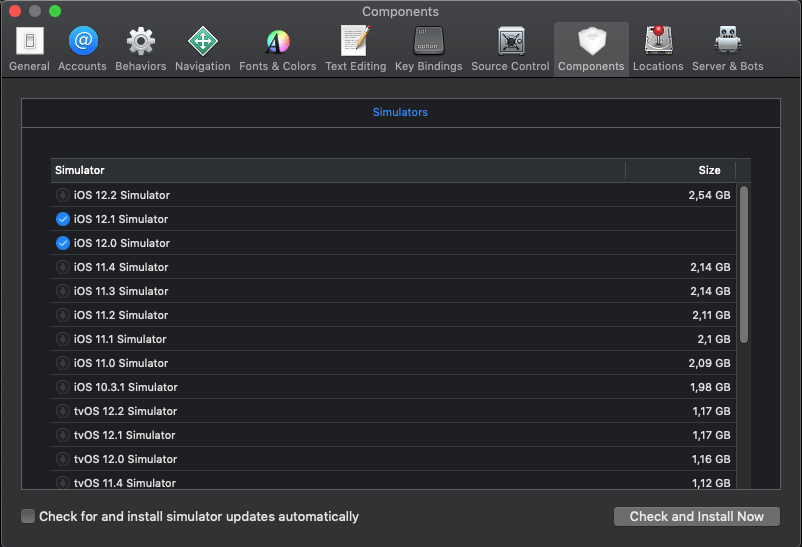
The argument -sdk iphonesimulator tells you to use the latest version of sdk available on our machine – currently it’s iOS 12.2, however you can indicate any sdk installed in Xcode. To install additional simulators, go to Xcode / Preferences / Components.
Step 4: Jenkins triggers
We already have a brand new lane in the fastfile file – we can use it when building the Jenkins version. To do this, create a Jenkins task, and in the section “Execute shell” put in:
bundle exec fastlane dev_simWhen working with fastlane, fastlane itself points out in the outline command line that certain environment variables must be taken care of – we add them in the section“Inject environment variables to the build process”:
LANG=en_US.UTF-8
LANGUAGE=en_US.UTF-8
LC_ALL=en_US.UTF-8
We already have Jenkins task creating the app file necessary for testing, we also have the task to run the appium and perform tests. You would still need to combine them somehow so that you do not have to manually start two tasks. We can do it using the cool Jenkins option – Build Triggers.
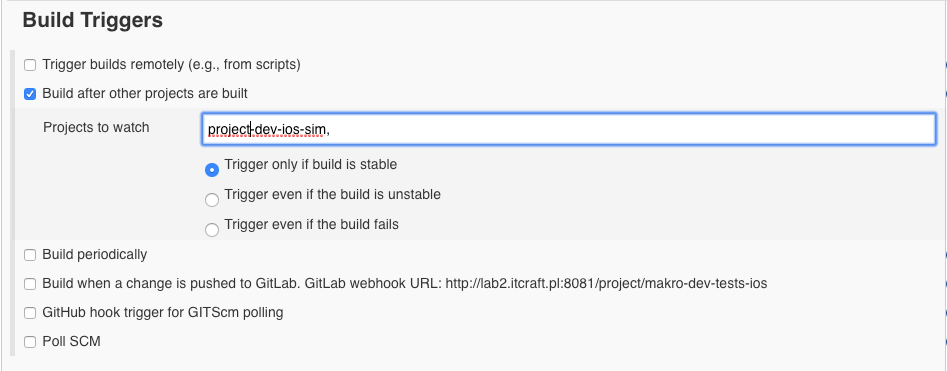
By defining triggering in our testing task this task when another project is successfully completed we create a queue of tasks for Jenkins. If the process of creating the app file from our application is successful – a UI test starts.
And you’re done 🙂
What next?
The correct performance of UI tests means that the version being tested is now very likely to have no regression errors. You might as well add to our task queue the automatic creation of a release type build and sending it to the Apple store for review. This however, is a whole another story :).