Implementing UserNotifications in iOS app – 6 step tutorial
The article was updated on 11th June 2019
Both local and remote iOS notifications have been around for a while now. From iOS 10, Apple is introducing a revamp in the form of a brand new framework for servicing them. UserNotifications brings significant improvements to the functionalities compared to older versions. Throughout recent years, notifications have been doing their main job – notifying the user, by sound (.sound), alerts (.alert) or ap icon badges (.badge). Although fitting the task, the notifications didn’t offer much to engage or draw user interest, and interacting with them caused launching the app indiscriminately.
iOS 10 changes
iOS 10 introduced notifications that can contain images, video, animations, maps, and user-defined, non-standard views. Changes in push notifications made new opportunities for iOS developers to create new ways of interacting with users. Although the UIImageView is not able to handle gif format, the notifications use gif as an attachment. Notifications can now contain multiple buttons giving various options for user response. From iOS 10 it is now possible to respond to chat app text messages directly from the notification – a great example of the feature in user friendly apps.
How do you implement the new notifications?
Step 1:
To start, create a new app project (In XCode, select New -> Project -> iOS -> Single View App, after clicking Next you name your project and choose a folder to save it).
Step 2:
Next, in AppDelegate, import the UserNotifications framework
import UserNotificationsStep 3:
Add UNUserNotificationCenterDelegate to AppDelegate:
@UIApplicationMain class AppDelegate:
  UIResponder,
  UIApplicationDelegate,
  UNUserNotificationCenterDelegate {
Step 4:
To register a local or remote notification, paste the code below into the applicationDidFinishLaunchingWithOptions method. As can be seen, you can authorize alerts, sounds, and badges appearing at the app’s icon.
func application(
  _ application: UIApplication,
  didFinishLaunchingWithOptions launchOptions: [UIApplication.LaunchOptionsKey : Any]? = nil
) -> Bool {
  UNUserNotificationCenter.current().requestAuthorization(
    options: [.alert, .sound]
  ) {(accepted, error) in
    if !accepted {
      print("Notification access denied.")
    }
  }
  UNUserNotificationCenter.current().delegate = self
  return true
}
Step 5:
Handling of the method to delegate for UserNotifications is done as follows:
func userNotificationCenter(
  _ center: UNUserNotificationCenter,
  willPresent notification: UNNotification,
  withCompletionHandler completionHandler: @escaping (UNNotificationPresentationOptions) -> Void) {

  completionHandler(.alert)
}

func userNotificationCenter(
  _ center: UNUserNotificationCenter,
  didReceive response: UNNotificationResponse,
  withCompletionHandler completionHandler: @escaping () -> Void) {

  completionHandler()
}
Step 6 – optional:
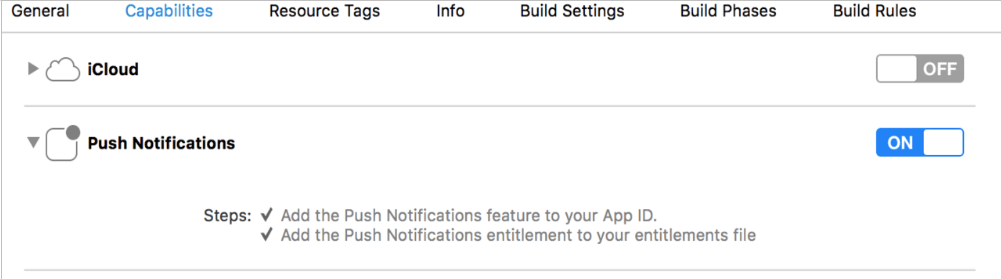
In cases where the app is to use remote notifications, it’s important to remember the following:
Practical use of UserNotifications
Now let’s take a look at the practical use of UserNotifications in an example app we will build.
Step 1:
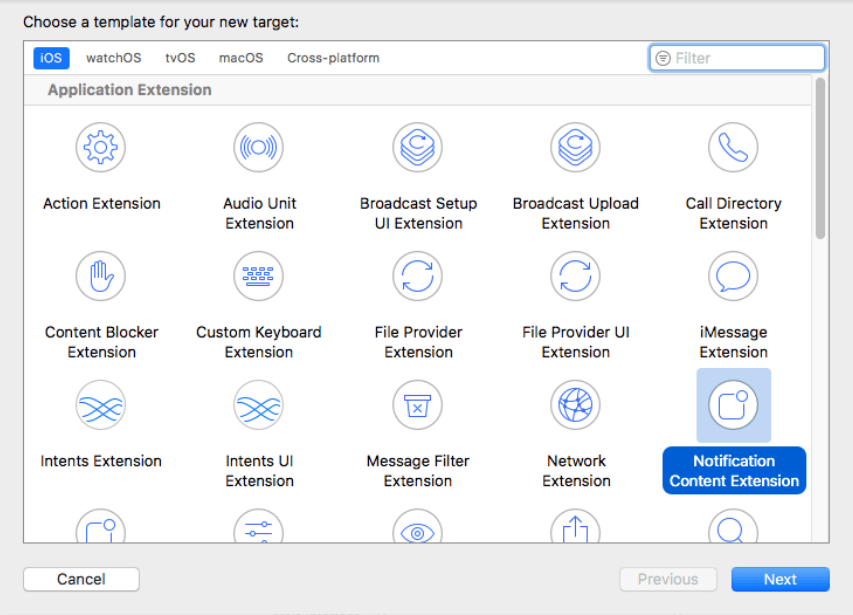
To change the notification view to a custom one, start with creating a dedicate Extension. In project settings, click the “+” icon in the bottom left corner of the screen.
Next, choose the Notification Content Extension in the iOS tab. After clicking next, type in a name in the Product Name sections. Use a name that will allow you to easily identify the Extension data eg.itCraftExtension.
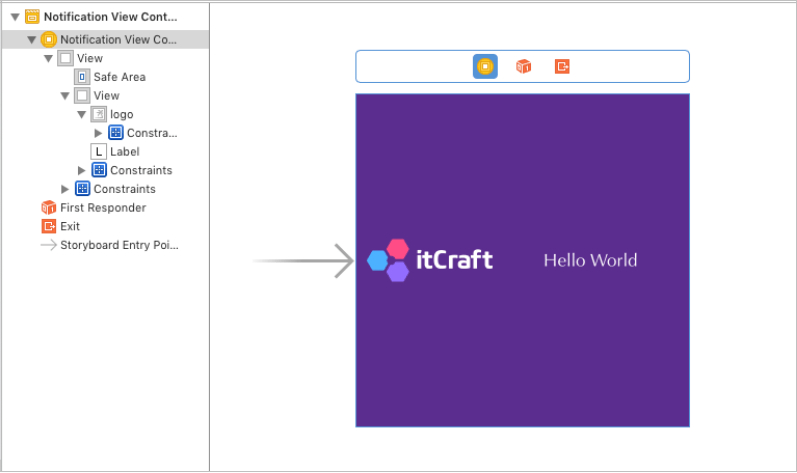
Once the Extension has been created, you will find a new catalog in your project, named after your new extension. It will contain 3 files: NotificationViewController.swift, MainInterface.storyboard and Info.plist. Opening the MainInterface.storyboard you will see the following:

So, we have created the extension, but how do we make the app use it?
Step 2
Let’s take a look at another newly created file – the Info.plist. After opening the file, go into the NSExtension:
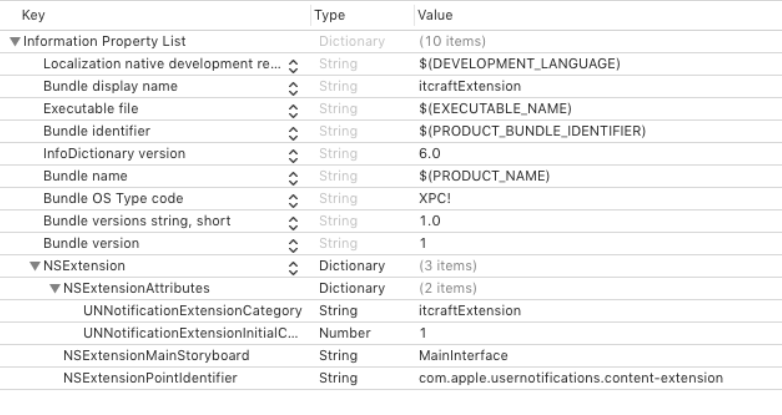
UNNotificationExtensionCategory is a string to identify the created Extension. As we can create multiple Notification Content Extensions, we need a way to easily tell them apart. For this, changing the name myNotificationCategory to something custom (eg. itcraftExtension) will be helpful.

Step 3
Back to our app. Find the ViewController.swift and Main.storyboard files (created at the start of a new project). Import the
import UserNotifications
...
@IBAction func itcraftButtonTap(_ sender: UIButton) {
let content = UNMutableNotificationContent()
content.title = "itCraft"
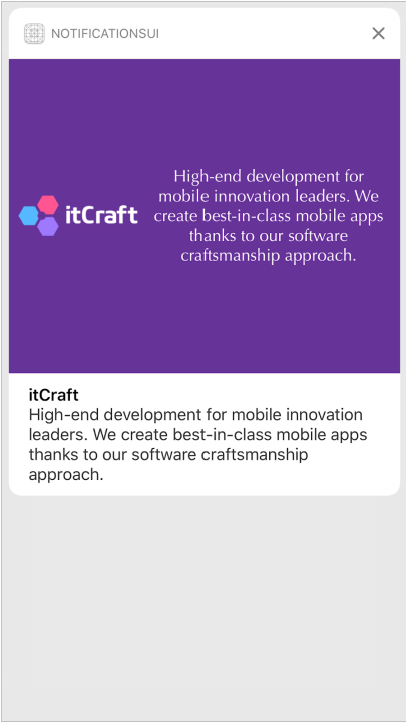
content.body = "High-end development for mobile innovation leaders. We create best-in-class mobile apps thanks to our software craftsmanship approach."
content.sound = UNNotificationSound.default
content.categoryIdentifier = "itcraftExtension"
addNotificationRequest(content: content)
}
func addNotificationRequest(content: UNMutableNotificationContent) {
guard let nextTriggerDate = Calendar.current.date(
byAdding: .second,
value: 4,
to: Date()) else { return }
let comps = Calendar.current.dateComponents(
[.calendar, .year, .month, .day, .hour, .minute, .second, .timeZone],
from: nextTriggerDate
)
let trigger = UNCalendarNotificationTrigger(dateMatching: comps, repeats: false)
let request = UNNotificationRequest(
identifier: "textNotification",
content: content,
trigger: trigger
)
UNUserNotificationCenter.current().add(request) { (error) in
if let error = error {
print(error.localizedDescription)
}
}
}The itcraftButtonTap method adds a notification that will use the created Extension (content.categoryIdentifier = “itcraftExtension”), whereas the addNotificationRequest method adds the notification to be launched by the app 4 seconds later. After the app launch and clicking the itcraftButton, you will see black text on green background – just like after opening MainInterface.storyboard in the itcraftExtension. Let’s change that!
Step 4
Open the MainInterface.storyboard and modify it as needed:
When adding static images or photos ensure that the image has the target set for both the app and the Extension. Save the changes and build the project. After clicking the (only) button in the app’s main view, you will see something that looks way better than a regular notification: